
Roof flashing plays one of the most important roles in protecting your home from water intrusion. Installed around vulnerable areas such as chimneys, vents, skylights, walls, and roof valleys, flashing creates a protective barrier that directs rainwater away from openings in your roofing system.
When flashing is installed incorrectly, even a high-quality roof can experience leaks and premature damage. Poorly secured materials, improper placement, or inadequate sealing can allow water to enter beneath shingles and damage insulation, decking, ceilings, and interior structures.
Many flashing problems remain hidden until homeowners notice stains, leaks, or signs of moisture inside the home. Recognizing the early warning signs of improper installation can help prevent expensive repairs. If you suspect flashing issues, scheduling a professional roof inspection can help identify problems before they cause major damage.
Homeowners can also review Maze Roofing’s broader roofing services when flashing problems are connected to leaks, damaged shingles, or other roof concerns.
Key Takeaways
- Water Stains Indicate Possible Flashing Failure: Ceiling discoloration and damp areas may signal water entering through improperly installed flashing.
- Loose or Exposed Flashing Is a Warning Sign: Visible gaps, lifted metal, or missing sealant can allow water to penetrate the roofing system.
- Proper Installation Prevents Leaks: Flashing must be correctly integrated with shingles and roof structures to create long-term protection.
- DIY Repairs Can Create Bigger Problems: Incorrect sealing methods may trap moisture or hide underlying damage.
- Professional Inspections Catch Hidden Issues: Roofing experts can identify flashing problems before they lead to costly structural repairs.
Why Roof Flashing Installation Matters
Roof flashing is designed to protect the areas where different parts of your roofing system meet. These transition points are naturally more vulnerable because water can collect and find pathways into small gaps.
Common flashing locations include:
- Chimney edges
- Roof-to-wall intersections
- Plumbing vents
- Skylights
- Roof valleys
- Dormers
When flashing is properly installed, it works together with shingles, underlayment, and drainage systems to move water safely away from the home.
However, poor installation can compromise the entire roofing system. According to the National Roofing Contractors Association (NRCA), proper roofing installation practices are essential for maintaining roof performance and preventing moisture-related issues.
Property owners can also explore completed Maze Roofing projects to see examples of professional roofing work and system installations.
Common Signs of Poor Roof Flashing Installation
Water Stains on Ceilings or Walls
One of the most common signs of flashing problems is unexplained water staining inside your home. Brown discoloration, peeling paint, or damp areas near ceilings and walls may indicate that water is entering through roof penetrations.
Flashing failures often allow water to travel behind walls or along roof decking before becoming visible inside the home. By the time a stain appears, moisture may already have affected insulation or structural materials.
Visible Gaps Around Flashing
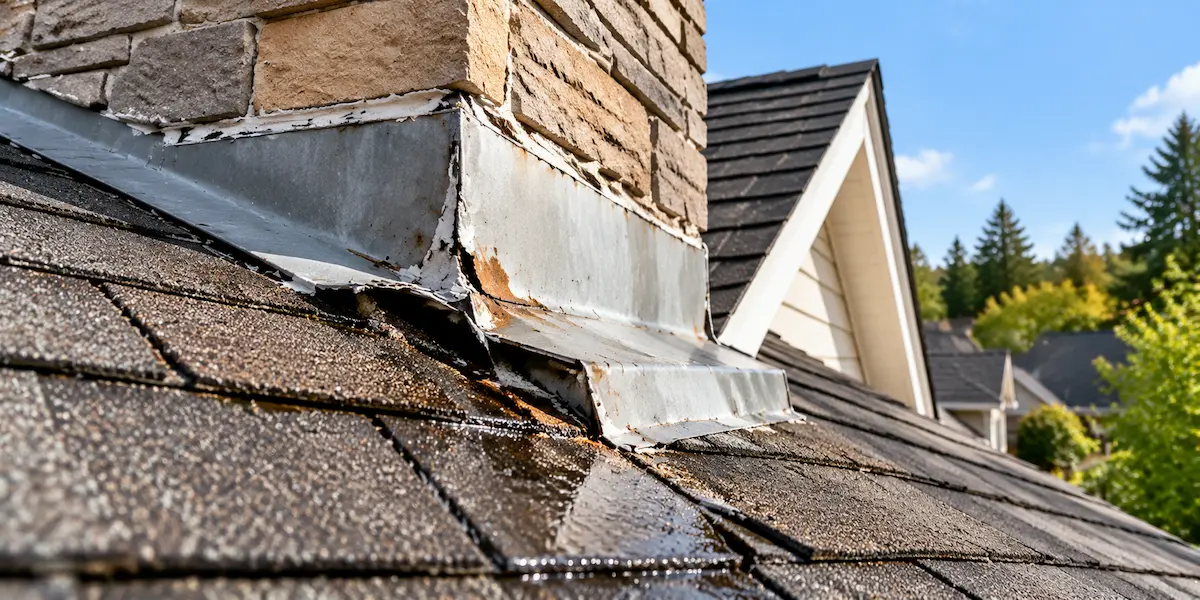
Properly installed flashing should sit securely against the roof surface and surrounding structures. If you notice gaps, lifted edges, exposed fasteners, or sections pulling away from the roof, water can easily enter these vulnerable areas.
Small openings can become larger over time due to wind, temperature changes, and repeated exposure to rain.
Rusted or Damaged Metal Flashing
Metal flashing is designed to withstand outdoor conditions, but poor installation can expose it to excessive moisture. Rust, corrosion, or visible deterioration may indicate that flashing is no longer providing reliable protection.
Damaged flashing should be evaluated rather than simply covered with additional sealant, as the underlying installation issue may still remain.
Excessive Use of Roofing Cement or Caulk
Sealants can help protect certain areas, but they should not replace proper flashing installation. Large amounts of roofing cement or caulk around flashing may indicate an attempt to compensate for incorrect placement or missing components.
Over time, sealants can crack, shrink, or separate from surfaces, allowing water to enter.
Step-by-Step Process for Identifying Flashing Problems
Homeowners can look for warning signs from the ground, but a professional inspection is needed for a complete evaluation.
1. Inspect Interior Areas for Moisture Signs
Check your attic, ceilings, and upper walls for:
- Water stains
- Damp insulation
- Mold-like odors
- Peeling paint
- Visible moisture
These signs may point to water entering through flashing failures.
2. Examine Roof Penetration Areas
Flashing problems commonly occur around areas where the roof is interrupted, including chimneys, vents, and skylights.
Look for:
- Loose metal edges
- Missing flashing pieces
- Cracked sealant
- Visible gaps
3. Check After Heavy Rain or Storms
Roof flashing issues often become more noticeable after severe weather. Inspect your home for new leaks or moisture marks after heavy rainfall.
Storm conditions can loosen improperly installed flashing and expose existing weaknesses.
Homeowners can review Maze Roofing’s service areas to see where professional roofing inspections and repairs are available.
4. Schedule a Professional Roof Assessment
A roofing professional can inspect flashing connections, underlying materials, and potential water entry points that are not visible from the ground.
Early detection can prevent minor flashing issues from becoming major roof repairs.
Learning more about Maze Roofing can also help homeowners understand the company’s approach to roof inspections, repairs, and long-term protection.
Common Roof Flashing Installation Mistakes
Installing Flashing Over Existing Problems
Flashing should be installed as part of a complete roofing system. Covering damaged areas without correcting the underlying issue can trap moisture and worsen deterioration.
Using Incorrect Flashing Materials
Different roof areas require specific flashing types and installation methods. Using the wrong material can lead to premature failure.
Improper Fastener Placement
Incorrectly placed nails or exposed fasteners can create openings where water enters the roofing system.
Relying Only on Sealant
Caulk and roofing cement are temporary solutions, not replacements for properly installed flashing.
Ignoring Small Leaks
Minor water intrusion can quickly lead to damaged decking, insulation problems, and interior repairs if left untreated.
Roof Flashing Materials and Their Applications
| Flashing Type | Common Location | Purpose |
| Step flashing | Roof and wall intersections | Directs water away from siding and roofing joints |
| Chimney flashing | Around chimneys | Prevents leaks where masonry meets roofing |
| Pipe flashing | Plumbing vents | Seals roof penetrations around pipes |
| Valley flashing | Roof valleys | Helps manage concentrated water flow |
Protect Your Home from Flashing Failures with Maze Roofing
Roof flashing may be one of the smallest components of your roofing system, but it provides essential protection against water damage. Poor installation can allow moisture to enter your home and create costly problems that extend beyond the roof itself.
Visit Maze Roofing to learn more about professional roofing solutions for inspections, repairs, and replacement projects.
Maze Roofing provides professional roof inspections, repairs, and expert recommendations to help homeowners maintain reliable protection against leaks and weather damage. If you notice signs of flashing failure or suspect your roof may have installation issues, contact Maze Roofing today for a thorough evaluation and dependable roofing solutions.
Frequently Asked Questions (FAQ)
How long should roof flashing last?
The lifespan of roof flashing depends on the material used, installation quality, and weather exposure. Properly installed flashing can last many years, but damaged or poorly installed flashing may fail much sooner.
Can bad flashing cause roof leaks?
Yes. Improperly installed flashing is one of the most common causes of leaks around chimneys, vents, skylights, and roof intersections.
Can I repair roof flashing myself?
Small sealing tasks may seem simple, but flashing repairs require proper installation techniques to prevent future leaks. Professional evaluation is recommended to ensure the problem is corrected correctly.
How do I know if my chimney flashing is failing?
Signs include water stains near the chimney, damaged metal flashing, loose sections, cracked sealant, or moisture in the attic around the chimney area.
Does replacing flashing require replacing the entire roof?
Not always. If the roof is otherwise in good condition, damaged flashing may be repaired or replaced without a complete roof replacement. A professional inspection can determine the best solution.